Block Properties Fields Tab
When configuring Block Properties on a block in a flow, the Fields tab shows the source and target fields. The source side displays the fields from the entity selected in the Query Block, operation results from prior Blocks, and fields from child entities if the Query Block includes Hierarchical data. The target side displays the fields from the Entity selected in the Block Properties General tab for this block. When working with Hierarchical Data you may see additional fields.
Use the Fields tab to:
- Create links between source and target data fields.
- Use the SmartMapper service to link selected source and target fields.
- Clear one or more target fields.
- Create simple or complex formulas to transform target data.
- View detailed information about any field in your source or target.
Fields Tab
Icons And Fonts
On the Fields tab, some fields contain either icons or different fonts to help you determine important fields.
| Icon | Definition |
|---|---|
|
Source Pane |
|
|
|
Select fields — Selects all fields for an entity in the Source Pane. Click the Deselect All link to clear selected fields for all entities. |
|
|
Clear Selected fields — When all fields for an entity are selected, this icon clears the selections for that entity in the Source Pane. Click the Deselect All link to clear selected fields for all entities. |
|
|
Primary key — One or more fields that uniquely identify each record in the source Entity. |
|
Target Pane |
|
|
|
Select fields — Selects all fields for an entity in the Target Pane. Click the Deselect All link to clear selected fields for all entities. |
|
|
Clear Selected fields — When all fields for an entity are selected, this icon clears the selections for that entity in the Target Pane. Click the Deselect All link to clear selected fields for all entities. |
|
|
Primary key — One or more fields that uniquely identify each record in the target Entity. |
|
Bold Text |
Required field — Fields that display in bold must have links. A warning displays until you create a link for this field. |
|
Italics Text |
Read-only field — Fields that display in italics should not be used with any formula or link that attempts to write to the field. However, you can use read-only source fields as a reference in formulas. A warning displays if you create a link on a read-only field. |
|
|
Link error — An error exists that causes this flow to be incomplete. When the app runs, TIBCO Cloud™ Integration - Connect skips this flow. |
|
|
Link warning — An error exists that may cause errors when the flow runs. |
|
|
Formula Icon — Opens the Formula Editor Overview. |
|
Target Pane - Conditional Field Mapping |
|
|
|
Skip Null Icon — Enables the Skip Null option for the field. If the field mapping results in a NULL value, the NULL is not written to the target field. |
|
|
Skip Null Enabled Icon — Indicates that the Skip Null option is enabled for this field. |
|
|
IsFieldSet Icon — Enables the ISFIELDSET function for this field. In some cases, when a Connector encounters a source field that has no value, it does not send the field at all. For example, if an address record were missing City, the Connector would send Street, State, Zipcode but would leave City out of the data set sent to the flow. Default behavior when a field is completely missing from the source and IsFieldSet is not enabled, is to write a NULL to the target database for that field. When IsFieldSet is enabled, if the field name is not included in the results from the source, nothing is written to the target for this field. If the field name is returned but has no associated value, it is written to the target as a blank or NULL. Note: This option can only be enabled for fields that are mapped with a field name. If the field contains a formula, this option cannot be selected. If a formula is entered after the option is set, a warning is displayed on the Errors and Warnings tab.
|
|
|
IsFieldSet Enabled Icon — Indicates that the IsFieldSet option is enabled for this field. |
|
|
Functional Condition Icon — Enables the Functional Condition option for this field and opens the Mapping Condition Editor where you can enter the associated formula. The formula must resolve to a boolean. If the formula resolves to true, the source value is written to the target. If the formula resolves to false, the source value is not written to the target. For example, if you enter the following:
IF(Source.City="Boston","False","True")
Using this formula, if the value of Source.City is Boston, the formula returns False and nothing is written to the target. If the value of the Source.City field is anything else, the formula returns True and the value of Source.City is written to the target. In this scenario, all cities except Boston would be written to the target.
If you enter the following:
IF(Source.City="Boston","True","False")
Using this formula, if the value of Source.City is Boston, the formula returns True and Boston is written to the target. If the value of the Source.City field is anything else, the formula returns False and the value of Source.City is not written to the target. In this scenario, only Boston would ever be written to the target. Note: The Mapping Condition dialog is very similar to the Formula Editor dialog. Make sure the title of the dialog says Mapping Condition. For information on using the fields on this dialog, see Formula Editor Overview.
|
|
|
Functional Condition Enabled Icon — Indicates that the Functional Condition option is enabled for this field. |
|
|
Clear Condition Icon — Indicates that the Functional Condition option is enabled for this field. Clears any conditional settings on the selected fields including: Skip Null IsFieldSet Functional Condition
Hover over the Condition Icon to display the Clear Icon. |
See Conditional Field Mapping for additional information.
Target Pane Toolbar
The Target pane toolbar contains the following options to help you easily manage links and formulas.
Select/Deselect all — From the toolbar only; select all fields in the Target or clear all selections.
Clear — Deletes the entire link including any formulas for the selected row or rows. To clear all fields, first use Select All then use Clear. The entire row must be selected, not just the Formula field.
SmartMapper — Select one or more fields in the source and target panels and use SmartMapper to link them. Source and target fields must have similar names and not be read-only to be linked by SmartMapper. Entity names are not considered part of the field name when SmartMapper is linking fields. See SmartMapper.
Skip Mapping If Null — If this option is enabled, when a mapped field or formula results in a NULL value, the NULL value is not written to the target. If all mapped fields result in NULL values, no updates are made and a record error similar to the following is generated:
Operation returned no results - Error in calling operation update
See Conditional Field Mapping for additional information.
Creating Data Links
When you create a data link between a source and target field, TIBCO Cloud™ Integration - Connect integrates the data from that source to the target field when the app runs.
When you are working with hierarchical data, source parent and child entities are available for mapping as long as there is a one-to-one relationship. If there is a one-to-many relationship or a collection, such as a Contact with several Addresses, you must use a For Each Child block and an Add block to access and write the children. See Hierarchical Data and Mapping Hierarchical Data Fields.
- Select the Source Entity Fields you want to link.
- Drag the source field to the target field.
- Unless there is a Data Type Mismatch or other problem, the source and target fields are now linked.
- The linked Source field, with its entity name, displays in the Formula column of the Target pane.
When you run your app, TIBCO Cloud™ Integration - Connect performs the requested operation on this data.
Formula Editor
Transform your data as it is integrated into the target by using the functions, operators, and constants in the Formula Editor. You can type a simple formula in the target field or use the Formula Editor for more complex formulas.
To open the Formula Editor, select a field and then select the Formula Editor icon ![]() . For details about creating and editing formulas, see Formula Editor Overview.
. For details about creating and editing formulas, see Formula Editor Overview.
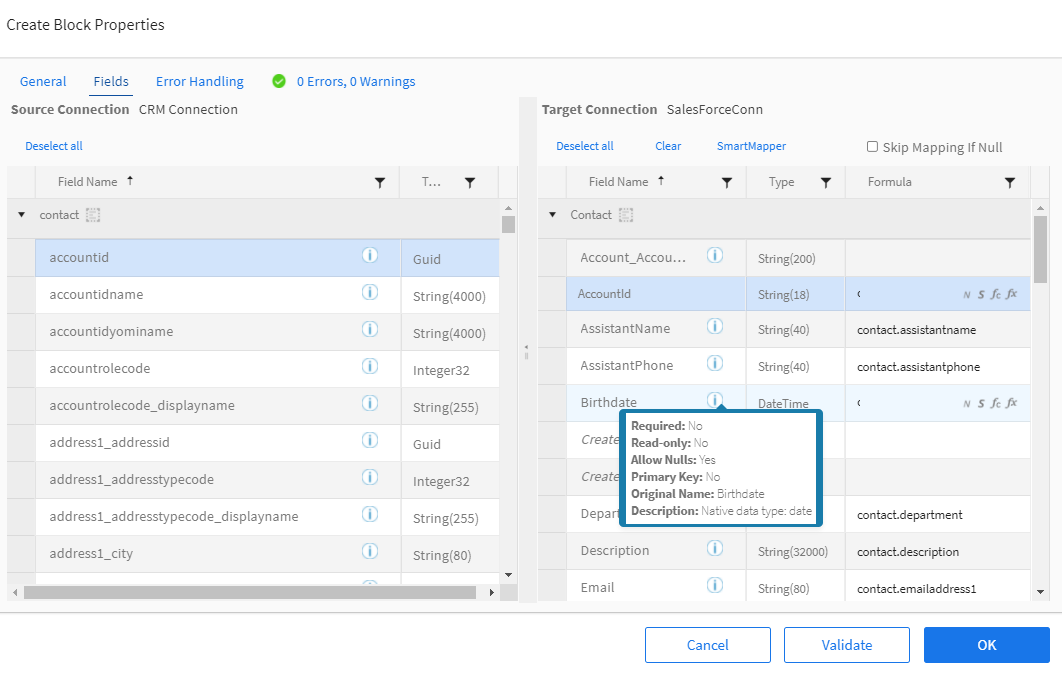
Viewing Field Properties
To access additional field information, select the Info icon ![]() for that field. Details displayed vary depending on the type of field selected but may include any of the following types of information.
for that field. Details displayed vary depending on the type of field selected but may include any of the following types of information.
| Field | Definition |
|---|---|
|
Allow Nulls |
Displays Yes or No to indicate whether or not NULL values are accepted. |
|
Primary Key |
Displays Yes or No to indicate whether or not the field is a Primary Key in the Source or Target datastore. Uniquely identifies the record in the datastore. |
|
Description |
Displays the native data type with any additional information available through the metadata, such as acceptable values for picklists, or if the field is an Id lookup field. Data types include: Boolean Currency Date Double Id Int Phone Picklist Reference String Textarea URL |
|
Original Name |
Displays the original name of a field when the field name shown in TIBCO Cloud™ Integration - Connect is different than the original field name from the datastore. |
Troubleshooting Field Links
If TIBCO Cloud™ Integration - Connect finds target fields that do not process correctly when the app runs:
- On the Fields tab, TIBCO Cloud™ Integration - Connect displays error (
 ) and warning (
 ) icons for target fields that need to be addressed.
 - The Errors/Warnings tab becomes available to provide detailed information about these fields. See Block And Flow Errors And Warnings.
Correcting Errors And Warnings
- If your target Connection requires a Match field, create a link from your source data to the Match field.
- If your target Connection has any required fields, create links for them.
- If you have invalid data in a field, place the cursor in the field, press CTRL and A to select the entire field, then backspace to clear the field. When the field is clear, either leave it blank or map it to a valid source field.
If there are other errors or warnings, see the Block And Flow Errors And Warnings for information.