Formula Editor Overview
In the Formula Editor use source fields and other information to search for or transform your data during an integration. Formulas can be simple or quite complex. Use the Formula Editor and the TIBCO Cloud™ Integration - Connect function library to create the formulas you need. The Formula Editor consists of four main panes.
Formula Editing Pane
Enter and edit formulas. Formulas can contain combinations of:
- Source Entity Fields
- Constants
- TIBCO Cloud™ Integration - Connect Functions
- Formula Editor Operators
- Comments
Use the ![]() and
and ![]() icons to expand and collapse the Formula Editing Pane.
icons to expand and collapse the Formula Editing Pane.
Categories Pane
Displays entity names and categories of functions.
- Source — Displays the primary Source entity as well as any entities that have a parent/child relationship to the primary entity. Select an entity name to display all of the fields in that entity in the Source pane.
- Operations — Displays the results of any operations defined in earlier Blocks, such as a Lookup block. If you select an Operation, the fields associated with that operation, including Result Fields, which provide information about the results from previous blocks, display in the Source pane and can be used in a formula.
- Function — Lists the categories of functions available in TIBCO Cloud™ Integration - Connect:
- Select a function category to display those functions in the Functions pane.
- Select All to display all available functions in alphabetical order.
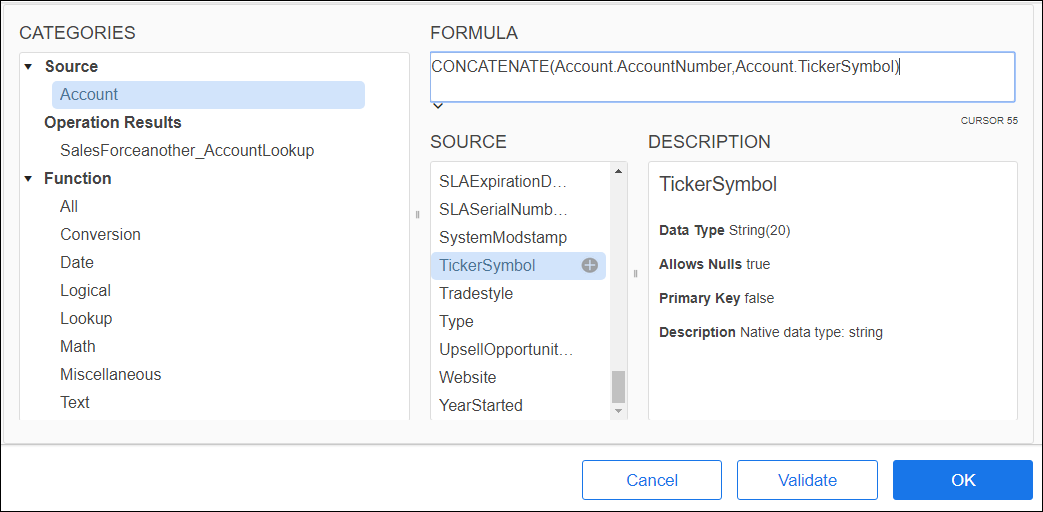
Center Pane
The title of the center pane depends on the selection in the Categories pane:
- When an entity from the Source category is selected, the center or Source pane displays all fields in the selected entity.
- When an Operation is selected, the center or Operation pane displays all fields available for that operation. Applies only to On schedule flows.
- When a Function category is selected, the center or Functions pane displays all associated functions. From the Functions or Fields pane:
For Source, Operation, or Function items:
- Select the name of an item in the center pane to display detailed information about the item in the Description pane.
- Select the Insert icon
 next the name of an item in the center pane to copy it to the Formula editing pane.
Description Pane
Displays a detailed description of the item selected in the center pane.
Using The Formula Editor
Creating Or Editing A Formula
- Open the Formula Editor:
- From Block Properties for a block in an On schedule flow, select the Fields tab.
- In the Target pane, select a field or an existing formula.
- Either type a formula into the field or select the Formula icon
 .
.
- The Formula Editor displays.
- If you selected a linked field, the source field name displays in the formula editing pane.
- If you selected an unlinked field, the formula editing pane is blank.
- In the Categories pane, you can select:
- An entity name from the Source list.
- All functions or a category of functions from the Functionslist.
- In the center pane, select the Insert icon next the name of the function or source entity field that you want to include in the formula.
The source field or function displays in the editing pane. Note: Select any field name or function to display a detailed description.
- Enter the remaining parameters, operators, comments, and other functions as needed. See Formula Editor Operators and Adding Comments.
- Validate your formula:
- After creating a formula, select Validate to ensure that the syntax is correct.
- If needed, make changes to correct the formula and then select Validate again.
- When you are done, select OK to save your formula and close the Formula Editor.
Rules For Entering Formulas
- You can create compound formulas that include more than one function.
- Entity names, field names, and function names in formulas are not case-sensitive.
- You can enter a formula of up to 1,024 characters directly into the Formula Editor workspace.
Adding Comments
When writing formulas, it can be useful to add comments to, for example, turn features on and off while testing or to provide information for other users.
Text in comments is not processed by TIBCO Cloud™ Integration - Connect and is ignored when you select Validate.
TIBCO Cloud™ Integration - Connect uses the following comment formats:
// Use two slashes for a one line comment.
/* Enclose multi-line comments within a slash
and an asterisk */
Using Quotation Marks In Formulas
- Do not use quotation marks with source references. Any data, including a source reference, surrounded by quotation marks is treated as a string literal.
- In a string constant, use two double-quotes in a row ("") to represent one double-quote in the string. For example, the string $"""Eat at Joe's"" Restaurant" returns: "Eat at Joe's" Restaurant.
Note: In this case, note that the quoted string is prefaced by three quotation marks; the first indicates the beginning of a string, and then two quotation marks are still required. Note also that the entire string is prefaced by a dollar sign ($). See Using Special Characters Within String Literals, below for information.
Validating Formulas
Validating a formula checks the syntax of your formula.
Select Validate from the Formula Editor.
- If there is a validation error, an error message displays.
- If the syntax does pass validation, a message with a green check mark
 displays.
Entering Boolean Values
When entering a formula that uses Boolean values, use Null for null, True for Boolean true, and False for Boolean false.
Using Special Characters Within String Literals
When you use certain special characters in a literal string, you can specify how TIBCO Cloud™ Integration - Connect processes them.
To have TIBCO Cloud™ Integration - Connect process escape sequences, such as \t (tab), \r\n (newline), or a double quotation mark (") within a literal string, you must begin the string with a dollar sign ($).
For example, the following formula, where AddressLine1 and AddressLine2 contain an address:
MyEntity.AddressLine1 & $"\r\n" & MyEntity.AddressLine2
Returns:
150 Dow Street
Suite 543A
The same formula, without the $ in front of the escape sequence:
MyEntity.AddressLine1 & "\r\n" & MyEntity.AddressLine2
Returns:
150 Dow Street\r\nSuite 543A
To represent a double quote in a constant, you must preface the text with a $ and two double quotes ($"") rather than backslash quote (\"). For example:
$"""Eat at Joe's"" Restaurant"
Returns:
"Eat at Joe's" Restaurant.