Installing TIBCO Business Studio™ for BusinessWorks™
Download and install TIBCO Business Studio for BusinessWorks to your local machine to use it.
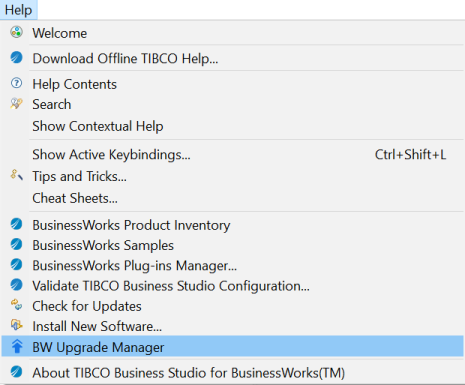
If you are upgrading an existing installation of TIBCO Business Studio™ for BusinessWorks™, you can upgrade from within your current instance of BusinessWorks by navigating to the Help > BW Upgrade Manager option.
See TIBCO Business Studio™ for BusinessWorks™ Upgrade Manager for additional details.
Installation Requirements
Before you install the product on your system, make sure that you can log in to your system with appropriate permissions, and your system meets the hardware and software requirements. Refer to the System Requirements. If you plan to install in an existing installation environment, stop all running processes in TIBCO_HOME.
Installation Account: The privileges required to install the product differ for Windows and UNIX platforms. Ensure that you have the appropriate privileges to install on the target platform.
- Microsoft Windows: You must have administrator privileges for the machine on which you want to install the software. If you do not have administrator privileges, the installer exits. If you want to install the product on a network drive, ensure that the account used for installation has permission to access the network drive.
- Mac and UNIX: Any user, regular user (nonroot), or super-user (root) can install TIBCO Business Studio for BusinessWorks.
- UNIX: On UNIX systems, a graphics environment such as CDE or X Windows is required to run the installer in GUI mode.
- Linux: On Linux systems, install the
libwebkitgtk-1.0-0library. This is required to access the online help in TIBCO Business Studio for BusinessWorks.- Run the following command to install it:
sudo apt-get install libwebkitgtk-1.0-0. - Restart TIBCO Business Studio for BusinessWorks if it is open.
- Run the following command to install it:
Hardware and Software Requirements
Review the system memory and disk space requirements before you start the installation. Requirements for installation can be found in the System Requirements.
While installing the product, avoid running other processes that consume disk space in the installation environment directory. If another process consumes disk space while the installer is copying the files, the installer might fail and display a failure message.
System and Disk Space Requirements
The System Requirements specify the system memory and disk space required for installation. In addition to the disk space in the temporary directory before installation, the installer requires additional space in the temporary directory to copy files during installation. Ensure that sufficient space is available in the directory you want to use as the installation environment (TIBCO_HOME).
Software Requirements
Before running the installer on a target platform, ensure that the platform is supported, and your system meets the software requirements.
Unless indicated otherwise, see the System Requirements for the supported products and versions.
Required Software
| Software | Required? |
|---|---|
| Eclipse components | Required. On some operating system platforms, TIBCO Universal Installer automatically downloads certain Eclipse LGPL components during installation, if necessary. However, on the Linux platform, you must download the Eclipse LGPL software assembly for your target platform before installing the software. |
| Sunec LGPL | Optional. The software requires the Sunec LGPL library only if you want to use the ECC ciphers with SSL/TLS configurations. Without the ECCL library, the SSL/TLS functionality is still available, but without ECC ciphers. Download the Sunec LGPL software assembly for your target platform before installing the software. |
Pre-Installation Tasks
Pre-installation tasks include the tasks that you must complete before you start the installer.
- Download TIBCO Business Studio for BusinessWorks from the TIBCO Cloud Integration web site. For details on how to do this, see Downloading TIBCO Cloud™ Integration Tools
-
Download Eclipse LGPL Software Assembly (Required on Linux) If the Eclipse LGPL software assembly (
product\_tibco\_eclipse_lgpl) is not present in the temporary directory where you extracted the product archive file, and the machine where you are running the TIBCO Business Studio for BusinessWorks installer is not connected to the internet, download the Eclipse LGPL software assembly for your target platform before you install TIBCO Business Studio for BusinessWorks.Save the downloaded assembly in a temporary directory accessible to the machine where you will run the installer. During installation, provide the location of the temporary directory where the downloaded software assembly is available.
If the machine is connected to the internet, you can download the Eclipse LGPL software assembly file for your target platform from the TIBCO Software Product Download Site during installation. The
product\_tibco\_eclipse\_lgpl\_4.4.1.001_OSplatform.zipis downloaded to the location that you select. -
Download Sunec LGPL (Oracle Elliptic Curve Cryptography Library) Software Assembly (Optional.)
The software requires the Sunec LGPL library only if you want to use the ECC ciphers with SSL/TLS configurations. Without the ECCL library, the SSL/TLS functionality is still available, but without ECC ciphers.
If the Sunec LGPL software assembly (
product\_tibco\_sunec) is not present in the temporary directory where you extracted the product archive file, and the machine where you will run the installer is not connected to the internet, download the Sunec LGPL software assembly for your target platform before you install TIBCO Business Studio for BusinessWorks.Save the downloaded assembly in a temporary directory accessible to the machine where you will run the installer. During installation, provide the location of the temporary directory where the downloaded software assembly is available.
If the machine is connected to the Internet, you can download the Eclipse LGPL software assembly file for your target platform from the TIBCO Software Product Download Site during installation. The
product\_tibco\_sunec\_1.7.0.091_OSplatform.zipis downloaded to the location that you select. -
On UNIX systems, a graphics environment such as CDE or X Windows is required to run the installer in GUI mode. If you do not have a graphics environment already installed, do so before you run the TIBCO Business Studio for BusinessWorks installer.
Installing TIBCO Business Studio for BusinessWorks
TIBCO provides product archive files that can be downloaded and installed using the TIBCO Universal Installer.
Extract the downloaded product archive file to a temporary directory, and then run the TIBCO Universal Installer executable from that directory.
Installation Modes
You can run the installer in one of the following modes. Each mode is supported on all platforms.
GUI Mode:
In GUI mode, invoke the installer by double-clicking the executable file, TIBCOUniversalInstaller.
The installer presents windows that you can use to select the product components and its location. Proceed through the installation process providing input as needed.
Console Mode: In console mode, you invoke the installer from a command prompt or a terminal window, and the installer prompts for values on the console. You can move through the installation process by responding to the prompts. This mode is useful if your machine does not have a GUI interface environment.
Silent Mode: In silent mode, the installer installs without prompting you for information. Silent mode either installs using the default settings or uses a response file that was saved during an earlier installation. In this mode:
- If no response file has been recorded earlier, invoke the installer with the
-silentargument to use the default installation parameters. - If a response file exists, invoke the installer with the arguments
-silent -V - responseFile="responseFileName" to use the values specified in the response file.
Installing in GUI Mode
When you run the installer in GUI mode, the installer presents panels for you to choose the installation environment and customize your installation.
- Run the
TIBCOUniversalInstallerexecutable.- On Microsoft Windows:
TIBCOUniversalInstaller-x86-64.exe - On Linux:
TIBCOUniversalInstaller-lnx-x86-64.bin - On macOS:
TIBCOUniversalInstaller-mac.command
- On Microsoft Windows:
- On the Welcome screen, click Next.
- Read through the license agreement, select I accept the terms of the license agreement if you agree to the terms, and click Next.
- Choose to create a new installation environment (
TIBCO_HOME) and specify the directory and name for the new environment. Then click Next.To create a new
TIBCO_HOME, specify the following properties:Property Description Directory The directory where the product is installed. The directory cannot be the same as the directory of an existing installation environment. The directory path cannot contain the following special characters: # $ % & * < > ? ` Name Identifies the installation environment. The name cannot contain the following special characters: " * / : < > ? \ To use an existing
TIBCO_HOME, select an existing installation environment from the list. - On the Installation Profile Selection screen, select the pre-configured profile (Typical), or click Customize Installation, and explicitly select the components you want to install. By default, the preconfigured profiles include the Oracle Elliptic Curve Cryptography Library (ECCL) component. The software requires the ECCL library only if you want to use the ECC ciphers with SSL/TLS configurations. Without the ECCL library, the SSL/TLS functionality is still available, but without the ECC ciphers.
- To continue with the default selection, click Next.
- If you do not plan to use the ECC ciphers, you do not need to download and install the ECCL library. Select the Customize Installation check box and clear the check box for the Oracle Elliptic Curve Cryptography Library component. Then click Next.
- On Linux and Solaris, the design feature requires Eclipse LGPL assembly to be available in the temporary directory before installation. See the section on Software Requirements above for details. The installer opens the LGPL License Agreement screen for the Eclipse LGPL assembly. Read through the license agreement, select I accept the terms of the license agreement if you agree to the terms, and click Next to proceed.
- On the LGPL Assembly Download screen, select one of the following download options and click Next.
- Download Gnome Binding assembly from TIBCO: Select this option if you are connected to the internet or do not want to use a previously downloaded assembly. The assembly is automatically downloaded and stored in the assemblies subdirectory of the directory where you extracted the installer.
- Provide the location for the assembly previously downloaded from TIBCO: Select this option if you are not connected to the internet. Click Browse to navigate to the directory where the previously downloaded LGPL assembly is stored. Select the directory, and click Open.
If you choose to install the Oracle Elliptic Curve Cryptography Library component, the design feature requires the Sunec LGPL assembly to be available in the temporary directory before installation. See the section on Software Requirements above for details. The installer prompts the LGPL License Agreement screen for the Sunec LGPL assembly. To download the Oracle Elliptic Curve Cryptography Library, select I accept the terms of the license agreement, and click Next. If you do not want to download the Oracle Elliptic Curve Cryptography Library, click Cancel to exit.
Note: Skip this step if the Oracle Elliptic Curve Cryptography Library component was not selected in the Installation Profile Selection screen. - On the Pre-Install Summary screen, verify the list of products and components selected for installation, and click Install.
- Verify the Post-Install Summary, click Finish to complete the installation process, and close the installer window.
Installing in Console Mode
When you run the installer in console mode, the installer prompts for values on a console window and you can move through the installation by responding to the prompts. Console mode can be used to install the software in a non-GUI environment.
Prerequisite: Prepare your system and the installation media before running the installer in console mode.
- Open a console window and navigate to the temporary directory where you extracted the product archive file.
- Run
TIBCOUniversalInstaller -console.The installer launches a second console window.
- Complete the installation by responding to the console window prompts, which are similar to those described in the section, [Installing in GUI Mode](#Installing in GUI Mode). The console also provides an option to return to a previous selection periodically.
- When the installation is completed, press Enter to exit the installer.
Installing in Silent Mode
When you run the installer in silent mode, the installer does not prompt for your input. Instead, the values specified in a response file are used to complete the installation. You can use a default preconfigured response file or create your own response file.
By default, the installer uses the TIBCOUniversalInstaller\_BW\_<version\>.silent file, which is included in the directory that contains the Universal Installer.
To customize the silent installer:
- Make a backup copy of
TIBCOUniversalInstaller\_BW\_<version\>.silentfile and rename the file, for example,newfile.silent.Edit the
TIBCOUniversalInstaller\_BW\_<version\>.silentfile itself. You can then run the silent installer with or without the response file argument. - Using a text editor, open the copied file and update the installation location and features to install.
- Open a console window, and navigate to the temporary directory where you extracted the product archive file and run the silent installer using one of the following commands:
- On Windows:
TIBCOUniversalInstaller.cmd -silent [-V responseFile="newfile.silent"] - On UNIX:
TIBCOUniversalInstaller.bin -silent [-V responseFile='newfile.silent'] - On macOS:
TIBCOUniversalInstaller-mac.command -silent [-V responseFile='newfile.silent']
- On Windows:
Troubleshooting the Installation
If you encounter problems during installation, ensure that your system meets all prerequisites, and then check the installer log for potential problems.
Installer Log File
The installer log file captures information such as:
- Environment details such as the user that invoked the installer, host name, and operating system details.
- List of assemblies installed.
- Information related to the Ant scripts executed by the installer.
The installer log file, tibco\_universal\_installer.username\_install.log is available in the following locations:
- On Windows:
C:\Users\username\.TIBCO\install\_timestamp - On Linux:
user\_home\_dir/.TIBCO/install\_timestamp
To change the location of the installer log file, specify the option -V logFile="myLogFile" when running the installer.
Starting TIBCO Business Studio for BusinessWorks
To start TIBCO Business Studio for BusinessWorks:
- On Windows: Click Start > All Programs > TIBCO > TIBCO_HOME > TIBCO Business Studio version_number > Studio for Designers
- On Linux and macOS: Run the TIBCO Business Studio for BusinessWorks executable located in the
TIBCO_HOME/studio/version_number/eclipsedirectory.
Installing Plug-Ins
You can optionally install plug-ins for TIBCO Business Studio for BusinessWorks. To install plug-ins, refer to Plug-in Installation.
Uninstalling the Software
The TIBCO Universal Installer can be used to uninstall the software. Using the Universal Installer, you can choose to uninstall either all products installed in the TIBCO_HOME directory or selected products.
To uninstall the product:
- Run the TIBCO Universal Installer (
TIBCOUniversalInstaller) from theTIBCO_HOME/tools/universal_installer/directory. - In the TIBCO Installation Manager screen, select Uninstall Products from a TIBCO Home Location, and select the
TIBCO_HOMElocation from the drop-down list. Then click Next. - Click Next on the Welcome screen.
- On the Uninstallation Type screen, choose the type of uninstall from the following options and then click Next.
- Custom Uninstall - Select the products to be removed.
- Typical Uninstall - Removes all the products in the selected
TIBCO_HOMEfolder.
- If you selected Custom Uninstall, select the products you want to uninstall on the Product Uninstall Selection screen. Then click Next.
- Review the product to be uninstalled in the Pre-Uninstall Summary screen, and click Uninstall to proceed.
The installer uninstalls the selected products.
- When prompted to clean up the
/toolsdirectory, click Yes, clean it up. - Click Finish in the Post Uninstall Summary screen to exit the uninstall wizard.
- If you have uninstalled all the software under
TIBCO_HOME, delete the folders under theTIBCO_HOMEdirectory.