Authentication
The TIBCO Cloud™ Integration API uses OAuth 2.0 authorization with a Bearer Token. All API methods must be called using an Authorization header for each HTTP request as shown in the following example. Replace <your-oauth-token> with the token you generated under your user settings in TIBCO Cloud Integration. See Enabling API Access.
curl -X GET "https://api.cloud.tibco.com/tci/v1/subscriptions/0/apps" -H "accept: application/json" -H "Authorization: Bearer <your-oauth-token>"
The OAuth token is associated directly with the organization you were in when you generated the token. Your OAuth token gives you access to the parent and related child organizations where you are a member. Each organization has an associated Subscription Locator to uniquely identify it when making an API call.
All HTTP calls to the API, except the GET users call, require a Subscription Locator to identify the organization you want to access. If you enter a 0 or do not provide a Subscription Locator, the API defaults to the Subscription Locator of the organization associated with your OAuth Token. See Finding a User's Organizations and Subscriptions with the TIBCO Cloud™ Integration API for more information.
Refreshing Your OAuth Token
OAuth tokens are valid for a maximum of 8 hours and must be refreshed periodically using a refresh token. Refresh tokens are valid for 7 days. See OAuth Access Tokens for additional details and examples.
To configure TIBCO Cloud™ Integration to generate refresh tokens:
- Configure an OAuth client under your TIBCO Cloud Integration user settings. This is required if you plan to refresh access tokens programatically. Be sure to copy the Client Secret immediately and store it in a safe location.
- Generate an initial OAuth access token under your TIBCO Cloud Integration user settings.
- Select Unlimited duration, refresh periodically. This setting allows you to use refresh tokens. If you select Valid for limited duration, you will need to generate a new token manually and update your code.
- Select the OAuth client you configured in Step 1.
- Enable the token for the Integration domain. Be sure to copy it immediately and store it in a safe location. The token is only displayed once when it is generated.
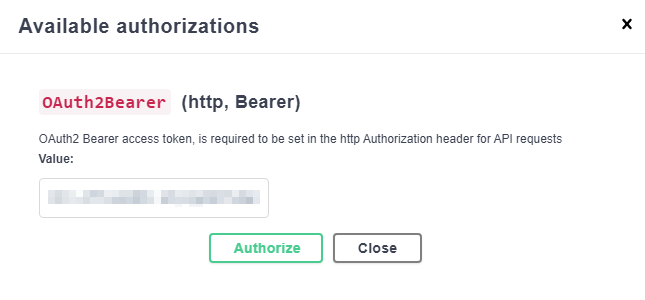
Authenticating on the Swagger Page
If you are using the Swagger page, click the Authorize button at the top of the page, paste your token in the Value field, and click Authorize. This stores your token as a variable and automatically adds it to each request from the Swagger page.