Using GraphQL Schema
GraphQL provides a powerful query language for your APIs enabling clients to get the exact data that they need. It can get data from multiple resources in a single request by aggregating the requested data to form one result set. GraphQL provides a single endpoint for accessing data in terms of types and fields.
Flogo provides an out-of-the-box GraphQL trigger that turns your Flogo app into a GraphQL server implementation. Each flow in the app acts like a GraphQL field resolver. So, the output of the flow must match the return type of the field in the schema.
Flogo allows you to create GraphQL triggers by dragging and dropping your GraphQL schema file into the UI or by navigating to the file. A flow gets automatically created for every query and mutation type in your schema. You must then open the flow and define what kind of data you want the flow to return. This saves you the time and effort to programmatically define data structures on the server.
GraphQL server implementation in Flogo
To obtain samples of GraphQL schemas and app JSON files, go to GraphQL.
To use GraphQL in Flogo, you must create a GraphQL trigger. Use one of the methods below to create a GraphQL trigger.
- You must use only one schema per app. If you attach your app to another GraphQL Trigger, you must use the same original schema.
- The implementation of the GraphQL server in Flogo currently does not return the specified field ordering in a query when a request is received. It does not affect the correctness of the response returned, but affects the readability and is non-compliant with current specifications.
- The GraphQL schema must have either
.gqlor.graphqlextension.
Creating a New Flogo App Using a GraphQL Schema
- Procedure
- Log in to TIBCO Cloud™ Integration.
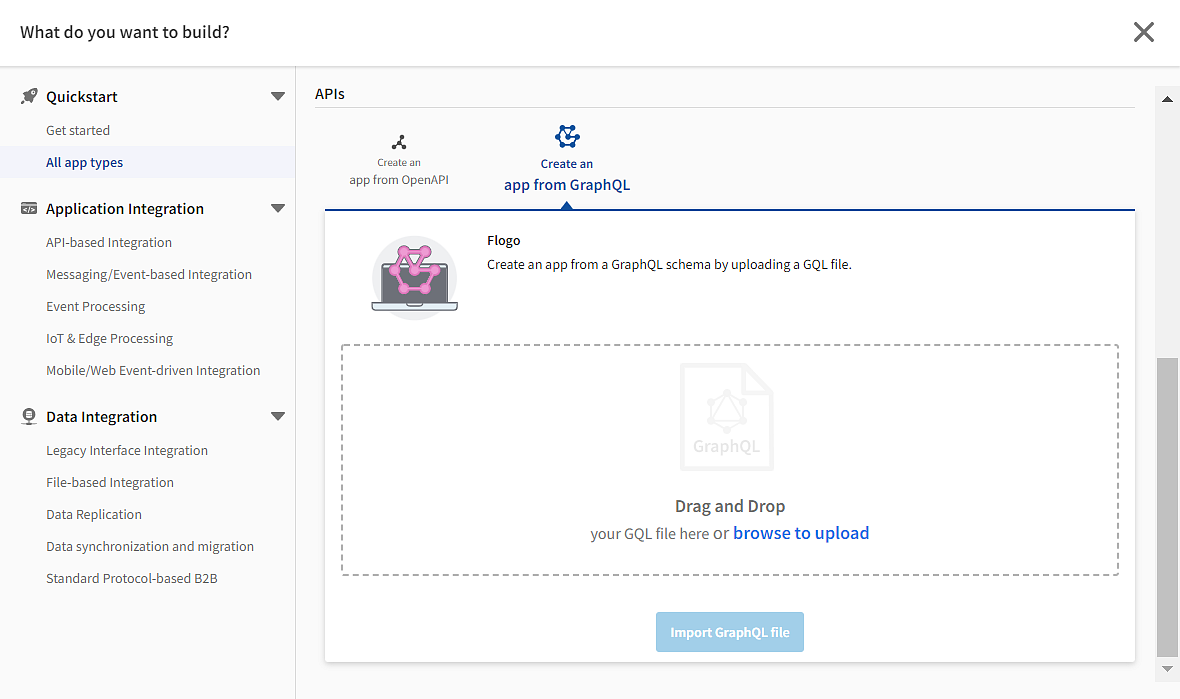
- On the Apps page, select Create/Import. The What do you want to build? dialog box is displayed.
- Under Quickstart > All app types > APIs, click Create an app from GraphQL.
- Click browse to upload and navigate to your locally stored GraphQL schema file to upload it.
- Click Import GraphQL file. The new GraphQL trigger gets created with a flow attached to it.
To implement a single method in your .gql file
To implement a single method:
- Procedure
- In Flogo, open the app details page and click Create. The Add triggers and flows dialog box opens.
- Under Create new, click Flow.
- Enter a name for the flow in the Name text box. Optionally, enter a description for the flow in the Description text box.
- Click Create.
- Select Start with a trigger.
- In the Triggers catalog, select the appropriate GraphQL Trigger card.
- Follow the screen prompts to configure the trigger. A flow with the name you specified gets created and attached to the newly created GraphQL trigger. This flow implements the method that you selected.
To implement all methods defined in your .gql file
You can create flows to implement all methods defined in your
.gql file. To do so:
- Procedure
- On the app details page, click Create. The Add triggers and flows dialog box opens.
- Under Start with, click GraphQL Schema.
- Upload your
<name>.gqlfile by either dragging and dropping it to the Add triggers and flows dialog box or navigating to it using the browse to upload link. Flogo validates the file extension. You see a green checkmark and the Upload appears. - Click Upload. Flogo validates the contents of your schema and if it passes the validation, it creates the flows based on the methods defined in your schema file. One flow is created for each method in your schema. All the flows are attached to the same trigger.
Manually attaching a flow to an existing GraphQL trigger
If you have an existing flow in an app, you can manually attach it to a GraphQL trigger. To do so:
- Procedure
- Click the flow name to open the flow details page.
- Click the
 icon to the left of your flow. By default, the existing GraphQL triggers in the app are displayed.
 - Select one of the existing GraphQL triggers and follow the on-screen directions.
Limitations on constructs in a GraphQL schema
Flogo currently does not support the following GraphQL constructs:
- Custom scalar types
- Custom directives
- Subscription type
- Cyclic dependency in the schema. For example, if you have a type
Bookthat contains an object element of the type,Author. The typeAuthorin turn contains an element of typeBookwhich represents the books written by the author. To retrieve theAuthor, it creates a cyclic dependency where theAuthorobject contains theBookobject and theBooktype, in turn, contains theAuthorobject.